Create Halloween-themed marketing props that draw attention, reinforce your campaign, and give customers a clear next action. This guide is for small-business owners, event organizers, and marketing staff with basic crafting skills. You will choose a purpose and location, make a brand-appropriate prop, add a readable message or call to action, and check that it is safe to display. Plan for 2–4 hours of hands-on work, not including time to order materials or get approvals.

Get business pricing on office and shipping supplies
- Business-only prices and quantity discounts
- Tax-exempt purchasing
- Multiple users, one account, clear invoices

Beeveer Halloween Photo Booth Props, 24 Designs, Double-Sided PVC
- ✔ Brand: Beeveer
- ✔ Material: PVC; listing also references PVC cardstock
- ✔ Design count: 24 designs stated

Inflatable Pumpkin Halloween Photo Booth Frame
- ✔ Brand: LMSHOWOWO
- ✔ Material: PVC
- ✔ Dimensions: 90 × 66 cm (35.43 × 25.98 in)
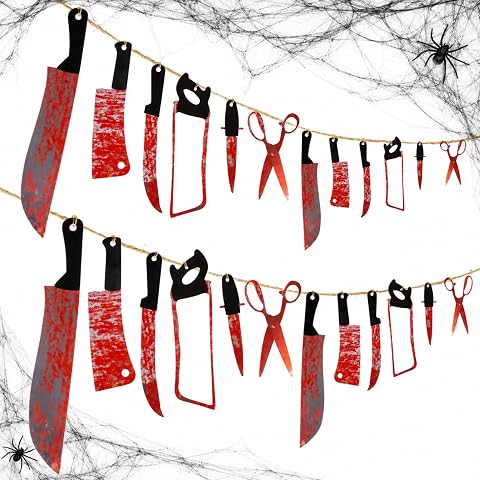
RAINFLOW 24-Piece Halloween Bloody Weapon Banner Decorations
- ✔ Brand: RAINFLOW
- ✔ Packs: 2 banners
- ✔ Total decorations: 24
Difficulty: Beginner | Time: 2–4 hours for planning and assembly, plus sourcing time
What You’ll Need
Tools & Materials:
- Paper, cardboard, foam board, or another suitable prop base
- Scissors or a craft knife and cutting mat
- Ruler, pencil, and markers or paint
- Printer or access to printed lettering, if needed
- Tape, glue, or removable mounting supplies suitable for the display surface
- Measuring tape and a phone camera for placement checks
Knowledge:
- Basic cutting, drawing, or assembly skills
- A clear understanding of the campaign offer, audience, and brand requirements
- Permission to place a display at the intended location
Set aside time to confirm the display location, dimensions, venue rules, and campaign details before making anything. Check whether the prop will be indoors or outdoors and choose materials and attachments for those conditions. Use a craft knife only on a cutting mat, and keep blades away from children and customers. Avoid open flames, exposed wiring, blocked exits, trip hazards, and props that could frighten or obstruct visitors.
Beeveer Halloween Photo Booth Props, 24 Designs, Double-Sided PVC
For events where we want guests to participate rather than simply pass a decoration, Beeveer’s handheld props are the most adaptable choice in this group. The listing describes colorful Halloween designs on double-sided, waterproof PVC, making them suitable for photo moments as well as table or room decoration. Compared with the inflatable pumpkin frame, these pieces are easier to distribute among guests and can support several small photo moments instead of one fixed station.The repeated-use and easy-clean claims are practical for event teams planning more than one gathering, especially if props will be handled throughout the night. Their listed size—about 11 by 5.5 inches—also suggests a manageable accessory rather than a large background element. That portability is an advantage over the 90 × 66 cm inflatable frame, but it also means Beeveer will not create the same unmistakable focal point from across a room.We would verify the pack contents before planning a group activity: the title says 24 designs, while the specs say 12 props, and the description uses both PVC and PVC cardstock language. Those inconsistencies make it hard to know how many guests can hold a prop at once or exactly what material will arrive. Choose this set when flexible photo accessories matter most; skip it if your event needs a guaranteed high piece count or one large, instantly recognizable display.
Pros:
- Colorful designs suit guest photos and can also be arranged as decorations.
- Double-sided presentation keeps the Halloween artwork visible from either direction.
- Waterproof, easy-clean construction is intended for repeated use.
- Compact pieces are easier to distribute and store than an inflatable frame.
Cons:
- The listing conflicts between 24 designs and 12 props, so the usable quantity is unclear.
- Material wording varies between PVC and PVC cardstock.
- Handheld props create less visual impact at a distance than the frame or banners.
Best for: Event hosts and small marketing teams seeking reusable handheld accessories for guest photos, table styling, and casual Halloween displays.
Not ideal for: Buyers who need a precisely confirmed prop count, a large backdrop, or a single statement piece visible across a venue.
Bottom line: We choose Beeveer for the broadest mix of guest interaction and small-scale display use, provided buyers confirm the pack quantity before relying on it for a crowd.
“We choose Beeveer for the broadest mix of guest interaction and small-scale display use, provided buyers confirm the pack quantity before relying on it for a crowd.”
Inflatable Pumpkin Halloween Photo Booth Frame
When we want a photo opportunity to be obvious without building a custom backdrop, this pumpkin-shaped inflatable frame offers a more defined station than Beeveer’s handheld pieces. Its 90 × 66 cm opening and classic motifs give guests a clear visual cue to pose, while the “Happy Halloween” lettering helps the setup read as seasonal even in a busy event space. That makes it a better fit for a school gathering, party entrance, or promotional activation organized around guest photos.Unlike the RAINFLOW banners, the frame is designed to surround a photo rather than decorate a stretch of wall. It also deflates for storage, so it can be packed away between events. The tradeoff is setup: the listing does not say an air pump is included, so we should not assume inflation will be effortless or that the frame can be deployed instantly. Its stated size is useful for a photo station, but it needs enough open space for guests to gather and pose.Waterproof PVC supports use in different event settings, although no specific mounting method or inflation time is provided. Compared with Beeveer, this is less flexible for table styling and handing out, but it provides a stronger single focal point. Choose it when a large, self-contained photo prop matters more than having multiple accessories; skip it if the venue is tight or your plan depends on an included pump.
Pros:
- Large pumpkin silhouette makes a clear focal point for guest photos.
- Deflates for more convenient storage between events.
- Waterproof PVC is suited to indoor or outdoor party settings.
- Classic Halloween decoration and lettering make the theme immediately legible.
Cons:
- An air pump is not listed as included, so inflation arrangements may be needed.
- Requires more open space than handheld props or a compact table display.
- Manual measurement may cause slight size variation.
Best for: Event planners, schools, and businesses creating a designated Halloween photo spot with a recognizable seasonal frame.
Not ideal for: Hosts with limited setup space or buyers who need a prop that is ready to use without arranging inflation equipment.
Bottom line: We recommend this frame when a dedicated photo station is the priority, but Beeveer is the more flexible choice for guests who need props in hand.
“We recommend this frame when a dedicated photo station is the priority, but Beeveer is the more flexible choice for guests who need props in hand.”
RAINFLOW 24-Piece Halloween Bloody Weapon Banner Decorations
RAINFLOW takes a different route from the photo-focused options: two pre-assembled banners make this the lineup’s clearest choice for dressing a wall, doorway, bar, or haunted-house area. Each banner carries 12 red weapon-shaped decorations, for 24 pieces total, and the supplied 5.6-foot ropes reduce the work of arranging separate ornaments. Compared with Beeveer’s small handheld accessories, the banners occupy more of the visual field; compared with the pumpkin frame, they create atmosphere rather than a defined pose-through photo opening.The shiny, bendable PVC construction is described as reusable, which helps if we want to bring the same dramatic look back for another event. Indoor and outdoor use is also listed, giving the banners flexibility for seasonal displays. Their imagery is deliberately more graphic than the cheerful pumpkin frame or colorful Beeveer props, so we should consider the audience and setting before choosing them for a family event or a polished brand activation.These are decorative props only, not functional weapons, and they should be presented as hanging decorations rather than interactive accessories. That distinction is important for both expectations and event planning. The product is a strong pick when we need a ready-to-hang, high-contrast Halloween backdrop; it is less suitable when guests need something to hold for photos or when the marketing tone calls for friendly, broadly family-oriented visuals.
Pros:
- Two pre-assembled banners provide 24 decorations in a ready-to-hang format.
- A 5.6-foot rope on each banner helps simplify placement.
- Shiny, bendable PVC is described as reusable for future displays.
- The bold red theme gives haunted-house and party spaces a stronger visual edge.
Cons:
- Decorations are for display only and cannot function as weapons.
- The graphic weapon theme may not suit family-oriented events or every brand.
- Unlike the other picks, the banners do not create a dedicated guest photo frame or handheld interaction.
Best for: Haunted houses, bars, and event teams building a dramatic hanging display with minimal assembly.
Not ideal for: Buyers seeking handheld photo accessories, a photo-frame prop, or a gentler visual style for family-focused promotions.
Bottom line: We choose RAINFLOW for a dramatic hanging display, not for interactive photo marketing or softer Halloween branding.
“We choose RAINFLOW for a dramatic hanging display, not for interactive photo marketing or softer Halloween branding.”
As an Amazon Associate we earn from qualifying purchases.
Before You Start
Decide what the prop needs to achieve: announce an offer, direct people to a booth, encourage a photo, or prompt a purchase. Choose one primary action rather than trying to fit in several messages. Confirm any offer dates, QR code destination, required disclaimers, and brand approval before printing or painting. Measure the display area and check sightlines from where people will approach. If the prop needs to attach to a wall, window, counter, or outdoor fixture, confirm that the mounting method is allowed and will not damage the surface.
Step-by-Step Instructions
Step 1: Choose one campaign goal
Write down the single result you want the prop to support, such as visits to a Halloween promotion, participation in a photo spot, or scans of a campaign QR code. Name the audience and the location where they will see it. Turn the goal into one short customer action, such as “Scan for the treat” or “Visit the costume-week offer.” Keep the action consistent with the real campaign and make sure the destination or offer is available for the full display period.
Tip: A prop can be decorative, but its marketing purpose should still be clear to the people who see it.
Check: You can explain in one sentence what visitors should do after noticing the prop.
Step 2: Select a format and check the display site
Choose a format suited to the goal and location: a tabletop sign, window cutout, freestanding photo frame, directional arrow, or small counter display. Measure the available width and height, then note the viewing distance and lighting. Ask the venue or property manager about permitted materials, attachment methods, maximum display size, and removal requirements. For outdoor placement, check expected wind and weather; use a stable, weather-resistant design or choose an indoor location instead.
Tip: Do not select a large freestanding prop until you know how it will be supported and kept out of walkways.
Check: You have the dimensions, placement permission, and a format that fits the site.
Step 3: Sketch the design and message
Make a quick sketch on paper before cutting materials. Place the main message or image where it will be noticed first, then add your logo and one call to action. Use Halloween elements that fit your business and audience, such as pumpkins, bats, autumn leaves, or friendly ghosts. Keep the design recognizable as your brand by using approved colors, typefaces, and logo artwork. Leave clear space around text and avoid adding decorative details that compete with the action.
Tip: Check that the concept feels appropriate for your customers; realistic gore or jump-scare imagery may be unsuitable in family spaces or professional settings.
Check: Someone unfamiliar with the campaign can identify the message and requested action from the sketch.
Step 4: Prepare the materials and copy
Choose a base that suits the location: sturdy card or foam board for indoor signs, or an approved weather-resistant material for outdoor use. Gather paint, printed lettering, adhesive, supports, and mounting supplies. Write the final copy in plain language and verify spelling, dates, prices, links, and QR code destinations. Print a small draft or display the design on a screen at the intended size. Test the QR code with a phone before incorporating it into the final prop.
Tip: Do not rely on a phone screen alone to judge legibility; a message that looks large on screen can be hard to read across a room.
Check: The content is approved, key details are accurate, and all links or codes work.
Step 5: Build the prop
Transfer the approved sketch to the base using light pencil marks or a printed template. Cut on a mat with suitable tools, keeping fingers clear of the blade. Apply the background first, then attach lettering and decorative elements. Use adhesive according to its instructions and allow paint or glue to dry fully before moving the prop. Add a stable backing, stand, or mounting points if the design needs support. Cover sharp cut edges where people may touch the prop.
Tip: Test a small patch of paint or adhesive on spare material first to check for smearing, discoloration, or poor adhesion.
Check: The prop stands or mounts securely, the text is intact, and there are no loose parts or exposed sharp edges.
Step 6: Review readability and safety
Place the prop temporarily at the planned viewing height and inspect it from the customer approach. Read the message from the farthest likely viewing point. Check that the logo, offer, and action are visible, with enough contrast between text and background. Confirm that the prop does not block signs, doors, payment areas, accessible routes, or emergency equipment. Check that cords, bases, and attachments cannot create a trip or snag hazard. Ask a colleague who has not seen the design to read it and describe what they would do.
Tip: If the wording is unclear, simplify it before increasing the amount of decoration or adding more text.
Check: A colleague can read the main message and action quickly, and the display leaves customer routes clear.
Step 7: Install and test the display
Install the prop using the approved attachment or support method. Keep it within the measured area and position it where the intended audience can see it without stepping aside or reaching across a counter. Check stability by gently testing the stand or mount. Scan any QR code from the actual customer position and verify the landing page on a phone. Photograph the installed prop, then check the image for glare, poor contrast, or visual clutter that may not be obvious up close.
Tip: Use only removable fasteners approved for the surface, and follow venue instructions for hanging or freestanding displays.
Check: The prop remains stable, the message and code are accessible, and the display is visible in a photo taken from the approach.
Step 8: Monitor, remove, and store
Check the prop during each day it is displayed. Straighten it, remove damaged or loose decorations, and confirm that the offer and QR code still work. Remove the prop when the campaign ends or its details become outdated. Take down attachments carefully, clear away scraps, and return the display area to its original condition. Store reusable pieces flat in a labeled container, away from moisture and heat, and record what should change before the next campaign.
Tip: Remove the display promptly if it becomes unstable, blocks access, or shows a wrong or expired offer.
Check: The site is clear after removal, reusable materials are stored safely, and campaign information is no longer visible.
Common Mistakes to Avoid
- Adding too many messages, decorations, or calls to action. — Choose one campaign goal and one primary action. Keep the main message visually dominant and remove details that do not support it.
- Making the text too small or using low-contrast colors. — Preview the design at its installed size and viewing distance. Use strong contrast and ask someone else to read it from the customer approach.
- Using materials or mounts that do not suit the display location. — Check indoor or outdoor conditions, surface restrictions, and venue rules before buying materials or attaching the prop.
- Displaying an incorrect offer, broken QR code, or expired campaign date. — Verify every detail and test links on a phone before installation. Set a removal or review date on the campaign checklist.
Troubleshooting
Problem: The prop tips over or shifts when customers pass.
Solution: Remove it from the customer area until stable. Add an approved support or heavier base, reduce the prop’s height, or move it to a protected surface. Keep any added weight out of walking routes.
Problem: The message is difficult to read from a distance.
Solution: Increase the size of the headline, use a simpler typeface, strengthen contrast, and remove secondary copy. Recheck from the farthest point where customers are expected to see it.
Problem: The QR code will not scan.
Solution: Check that it links to a live page, print it at a larger size, preserve the clear border around the code, and avoid placing it over a fold or textured area. Test it again after installation under the site’s actual lighting.
Problem: Paint, lettering, or decorations peel or smear.
Solution: Take the prop out of use if loose pieces could fall or create a hazard. Let wet layers dry fully, use an adhesive compatible with the base, and repair or remake the affected area before reinstalling.
What Success Looks Like
The finished prop fits its approved location, looks recognizably connected to the brand, and communicates one accurate campaign message with a clear customer action. A visitor can read it from the approach, use its QR code or other response method, and reach the intended destination. The prop stays stable, does not block access or create sharp-edge, electrical, or trip hazards, and can be removed without leaving damage or debris.
Next Steps
Track the response that matches the prop’s goal, such as QR scans, promotion redemptions, booth visits, or customer participation. Compare results with the display period and location rather than relying only on impressions. Save a photo, final artwork, material list, measurements, and any venue approval for reuse. Note which message and placement worked, then revise the next prop based on the results. Remove or update the prop whenever the offer, link, or campaign dates change.
Frequently Asked Questions
What is a good Halloween marketing prop for a small business?
Choose a format that fits the customer interaction: a small counter sign for a promotion, a window display for passersby, or a photo frame for a social-sharing activity. Keep the design and call to action connected to a real campaign, and choose a size that fits the available space.
How do I make a Halloween prop look on-brand?
Use approved logo artwork, brand colors, and typography, then add a limited number of seasonal details. Keep the brand or campaign message more prominent than the decoration, and check the finished design against any brand guidelines before building it.
Can I use these props outdoors?
Yes, if the location permits it and the materials and support can handle the expected weather. Use suitable weather-resistant materials, secure the display against wind, and inspect it regularly. Bring it indoors or remove it if rain, wind, or damage makes it unsafe.
How can I tell whether the prop is working as marketing?
Connect the design to a measurable action, such as a trackable QR code, a campaign-specific offer, or a count of event interactions. Record the display location and dates so you can compare results and distinguish the prop’s response from other campaign activity.
Fall Picks
fall essentials
As an affiliate, we earn on qualifying purchases.